Archive for the ‘Research & Activity’ Category

Aplikasi Kubernetes sebagai platform pada ‘connected vehicle’

Di KubeFest Tokyo 2020 pekan lalu, Denso (perusahaan Jepang, automotive-parts manufacturer) membawakan presentasi tentang prototype k8s platform bernama “Misaki”, Kubernetes based connected vehicle platform.

Konsepnya menarik, platform Kubernetes nya didesain dalam bentuk sebuah ‘vehicle cluster’ dengan Master Node/Control Plane berada di Cloud, dan Worker Node(Edge) yang berada di ECU pada sebuah mobil. ECU(Electronic Control Unit) sebagai unit komputasi terintegrasi yang berperan tidak hanya sebagai k8s worker node, tapi juga menjadi pengendali berbagai sensor yang ada di sebuah mobil pintar.

Implementasi use-case nya adalah ‘connected vehicle’, dimana Kubernetes cluster terdiri dari Control Plane dengan Edge node yang bisa dikendalikan secara dinamis. Ketika disetel pada mode connected vehicle, Edge dari banyak mobil pintar terkoneksi dalam satu Kubernetes cluster, yang dalam arti lain sistem ini bisa mengendalikan banyak unit mobil dalam satu cluster nya. Tentunya untuk alasan keamanan, high-spec ECU yang berperan sebagai k8s worker node beroperasi terpisah dengan ECU lain yang mengendalikan operasi dasar sebuah mobil (jalan, berhenti, belok). Sehingga meminimalisir kemungkinan pengendalian mobil oleh pihak luar yang bermaksud tidak baik.

Aplikasi pada sebuah mobil pintar didesain dalam bentuk Pod yang bekerja di atas Edge node. Pod dapat didesain sesuai kebutuhan, misalnya: Anda bisa membuat Pod yang tugasnya untuk mengumpulkan data pada berbagai sensor mobil (camera, rain sensor, accessmeter, battery sensor, etc) dan mengirimkan data tersebut ke storage di Cloud untuk proses selanjutnya. Karena banyaknya sensor dan aplikasi Pod, dibutuhkan peran Kubernetes sebagai orkestrator microservice sekaligus mengatur resource pada ECU secara fleksibel.

Ada banyak challenges yang dihadapi dalam pengembangan sistem ini. Salah satunya adalah ketika putusnya koneksi jaringan antara Edge unit dengan Control Plane ketika mobil berada di luar jangkauan. Untuk mengatasi hal tersebut, “Misaki” mengimplementasikan ServiceMesh berupa sistem ‘Queue’ yang mempunyai peran sebagai proxy server ketika koneksi jaringan terputus. Queue berfungsi untuk menyimpan HTTP Request dan streaming-data dari aplikasi ketika terjadi gangguan koneksi jaringan, dan apabila koneksi kembali normal, maka Queue akan melakukan retry untuk mengirimkan data yang tersimpan di local storage nya.

Silakan bisa melihat lebih detail tentang arsitektur nya di SlideShare berikut:

Atau lihat di sini untuk presentasi tentang Technical Details nya:


Install OpenCV 4 on Mac OS

Install OpenCV 4.0 on Mac OS

Step 1. Install XCode
1.1. First, we need to install the latest XCode.
Grab the info and download the binary from the below Apple website:
https://developer.apple.com/xcode/

Or, you may download XCode from Apple App Store -> find the XCode app -> install XCode.

1.2. After installation completed, open XCode and accept license agreement.


Step 2. Install Homebrew

2.1. Install the Mac community package manager, Homebrew.

$ ruby -e "$(curl -fsSL https://raw.githubusercontent.com/Homebrew/install/master/install)"

Then, update the Homebrew definitions:

$ brew update

2.2. Add Homebrew to PATH
In order to make our work simple, don’t forget to add Homebrew to our working PATH at .bash_profile file.

$ echo "# Homebrew" >> ~/.bash_profile
$ echo "export PATH=/usr/local/bin:$PATH" >> ~/.bash_profile


Step 3. Install OpenCV prerequisites using Homebrew

3.1. Install Python 3.6

$ brew install python3

Verify whether the Python installation OK or not by typing the below command:

$ which python3
/usr/local/bin/python3

$ python3

Python 3.6.5 (default, Jun 17 2018, 12:13:06) 
[GCC 4.2.1 Compatible Apple LLVM 9.1.0 (clang-902.0.39.2)] on darwin
Type "help", "copyright", "credits" or "license" for more information.
>>>
>>>exit()

3.2. Install CMake and QT (optional)
(This code is only executed if you need CMake and QT for your development)
If you need to work the OpenCV project with CMake and QT, you can execute the below code. If you only need Python, skip this procedure.

$ brew install cmake
$ brew install qt5

Later in this installation, we need to specify the QT path to a variable:

$ QT5PATH=/usr/local/Cellar/qt/5.12.2

*make sure the above path is available on your environment. Check the availability by making sure the path (ls -l /usr/local/Cellar)

Step 4: Install Python dependencies for OpenCV 4
We will install the Python dependencies for OpenCV 4 in this procedure.

$ sudo -H pip3 install -U pip numpy

Now the pip is installed, next, we can install virtualenv and virtualenvwrapper, two tools for managing virtual environments. Python virtual environments are a best practice for Python development and recommended to take full advantage of them.

$ sudo -H python3 -m pip install virtualenv virtualenvwrapper

$ VIRTUALENVWRAPPER_PYTHON=/usr/local/bin/python3

$ echo "VIRTUALENVWRAPPER_PYTHON=/usr/local/bin/python3" >> ~/.bash_profile
$ echo "# Virtual Environment Wrapper" >> ~/.bash_profile
$ echo "source /usr/local/bin/virtualenvwrapper.sh" >> ~/.bash_profile

$ source /usr/local/bin/virtualenvwrapper.sh

The virtualenvwrapper tool provides various of terminal commands:
-mkvirtualenv : Used to “make a virtual environment”
-rmvirtualenv : Destroys a virtual environment
-workon : Activates a virtual environment
-deactivate : Deactivates the current virtual environment
-Refer to this link for more information.

Now, let’s create a Python virtual environment for OpenCV.
In this command, the virtual environment for Python 3 and OpenCV4 will be defined as py3cv4. You may take your own virtual environment name as you wish.

$ mkvirtualenv py3cv4 -p python3

The command result may look like this:

Running virtualenv with interpreter /usr/local/bin/python3
Using base prefix '/usr/local/Cellar/python/3.6.5_1/Frameworks/Python.framework/Versions/3.6'
New python executable in /Users/admin/.virtualenvs/cv/bin/python3.6
Also creating executable in /Users/admin/.virtualenvs/cv/bin/python
Installing setuptools, pip, wheel...
done.
virtualenvwrapper.user_scripts creating /Users/admin/.virtualenvs/cv/bin/predeactivate
virtualenvwrapper.user_scripts creating /Users/admin/.virtualenvs/cv/bin/postdeactivate
virtualenvwrapper.user_scripts creating /Users/admin/.virtualenvs/cv/bin/preactivate
virtualenvwrapper.user_scripts creating /Users/admin/.virtualenvs/cv/bin/postactivate
virtualenvwrapper.user_scripts creating /Users/admin/.virtualenvs/cv/bin/get_env_details

Next, let’s install NumPy, CMake, and other library while we’re inside the environment.

$ pip install cmake numpy scipy matplotlib scikit-image scikit-learn ipython dlib

# quit virtual environment
$ deactivate


Step #5: Compile OpenCV 4 for macOS

5.1. Download OpenCV 4
Navigate to our working folder and download both opencv and opencv_contrib.
In this command, we will create opencv and opencv_contrib folder inside home folder.

$ mkdir -p ~/opencv ~/opencv_contrib
$ git clone https://github.com/opencv/opencv.git
$ cd opencv
$ git checkout master
$ cd ..

$ git clone https://github.com/opencv/opencv_contrib.git
$ cd opencv_contrib
$ git checkout master
$ cd ..

Navigate back to OpenCV repo and create & enter a build directory.

$ cd ~/opencv
$ mkdir build
$ cd build

Now we are ready to execute the CMake.
Make sure to use the workon command before executing the cmake command as shown below.
Notes: I am using py3cv4 as virtual environment. If you are using other name for virtual environment, you should change the below code as your own environment.
This command will take several times. (in my environment it took about 50 minutes ^^;)

$ workon py3cv4
$ cmake -D CMAKE_BUILD_TYPE=RELEASE \
    -D CMAKE_INSTALL_PREFIX=/usr/local \
    -D OPENCV_EXTRA_MODULES_PATH=../../opencv_contrib/modules \
    -D OPENCV_PYTHON3_INSTALL_PATH=~/.virtualenvs/py3cv4/lib/python3.7/site-packages \
    -D PYTHON3_LIBRARY=`python -c 'import subprocess ; import sys ; s = subprocess.check_output("python-config --configdir", shell=True).decode("utf-8").strip() ; (M, m) = sys.version_info[:2] ; print("{}/libpython{}.{}.dylib".format(s, M, m))'` \
    -D PYTHON3_INCLUDE_DIR=`python -c 'import distutils.sysconfig as s; print(s.get_python_inc())'` \
    -D PYTHON3_EXECUTABLE=$VIRTUAL_ENV/bin/python \
    -D BUILD_opencv_python2=OFF \
    -D BUILD_opencv_python3=ON \
    -D INSTALL_PYTHON_EXAMPLES=ON \
    -D WITH_TBB=ON \
    -D WITH_V4L=ON \
    -D INSTALL_C_EXAMPLES=OFF \
    -D OPENCV_ENABLE_NONFREE=ON \
    -D WITH_OPENGL=ON \
    -D OPENCV_EXTRA_MODULES_PATH=../../opencv_contrib/modules \
    -D BUILD_EXAMPLES=ON ..

Notes:
-OPENCV_ENABLE_NONFREE=ON
This is required for OpenCV 4 if you want access to patented algorithms for educational purposes.
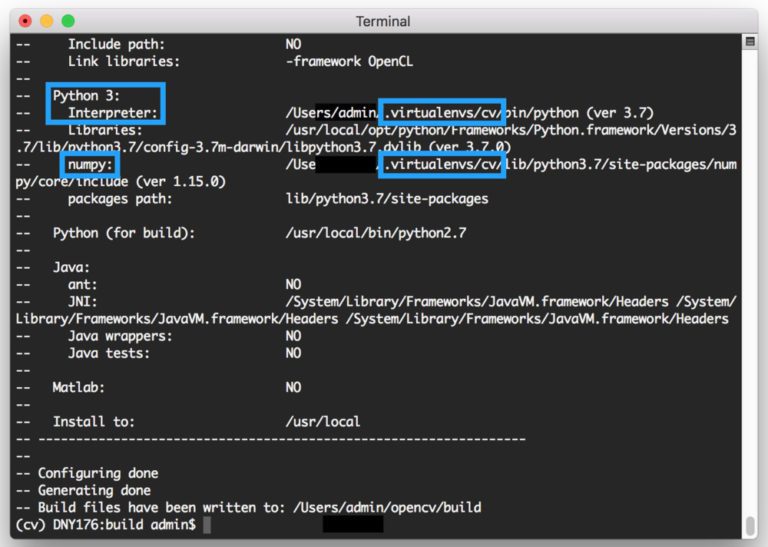
-Once CMake has finished, you will see the following information in the terminal:

*If you need QT in your project, don’t forget to add the below command.
The QT5PATH should be defined in the previous step (3.2. Install CMake and QT)

-D CMAKE_PREFIX_PATH=$QT5PATH \
-D CMAKE_MODULE_PATH="$QT5PATH"/lib/cmake \

Up to this step, if your CMake output is good to go you can kick off the compilation via:

$ make -j$(sysctl -n hw.physicalcpu)
 	
$ sudo make install

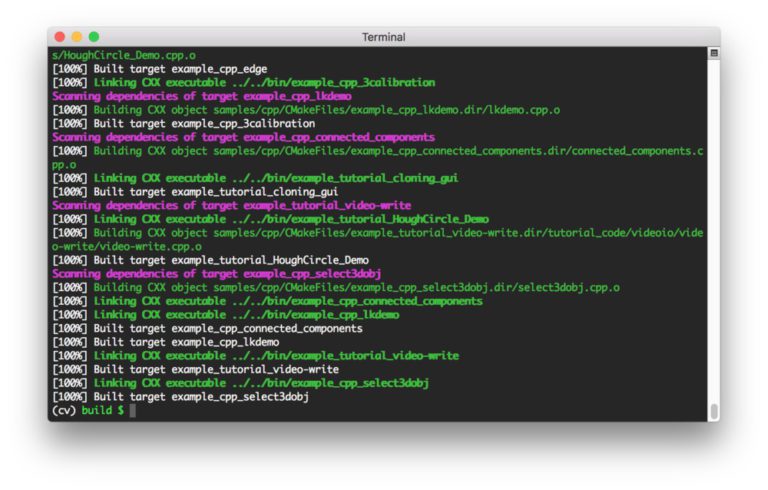
When the process is finished 100%, the screenshot should be like this:

5.2. Install imutils

$ workon py3cv4
$ pip install imutils


Step 6: Test your macOS + OpenCV 4

#Activate your Virtual Environment
$ workon py3cv4

$ python
>>> import cv2
>>> cv2.__version__
'4.0.0'
>>> exit()

Lets Run Our First OpenCV Application!
You may clone one of my OpenCV sample from the below GitHub resource.
https://github.com/fahmifahim/opencv

#Activate your Virtual Environment
$ workon py3cv4

$ git clone https://github.com/fahmifahim/opencv.git

Cloning into 'opencv'...
remote: Enumerating objects: 46, done.
remote: Counting objects: 100% (46/46), done.
remote: Compressing objects: 100% (42/42), done.
remote: Total 46 (delta 2), reused 46 (delta 2), pack-reused 0
Unpacking objects: 100% (46/46), done.

$ ls 
opencv

$ cd opencv/1_experiment/1_face_recognition_adrian/

#Execute the Python program for Realtime Face Recognition: 
$ python recognize_video.py --detector face_detection_model \
	--embedding-model openface_nn4.small2.v1.t7 \
	--recognizer output/recognizer.pickle \
	--le output/le.pickle

#Change directory to Face Detection program
$ cd ../2_face_detection_deeplearning

$ python detect_faces.py --image leaders.jpg --prototxt deploy.prototxt.txt --model res10_300x300_ssd_iter_140000.caffemodel 

#When you finish the program, deactivate Virtual Environment
$ deactivate

Sample result:

Reference:

Install OpenCV 4 on macOS (C++ and Python)

Install OpenCV 4 on macOS

Files to copy when migrating your Lotus Notes installation to a new computer (Windows Mac)

Troubleshooting

Problem

You have a new workstation to which you need to transfer your Lotus Notes configurations and data. What are the default files a user needs to copy over from the old workstation to the new workstation?

Resolving The Problem

The necessary system files are as follows:
1. Personal Address Book (typically Names.nsf; check the NAMES entry in the Notes.ini to confirm).
2. Bookmark.nsf
3. Desktop.ndk
4. Notes.ini
5. The user’s .ID file.


Windows:
Folder location
c:¥Notes\Data

Files:
bookmark.nsf
desktop8.ndk
names.nsf
The user’s.nsf
The user’s.ID

MAC
Folder location
/Users/{YourUserName}/Library/Application Support/IBM Notes Data

You may use the below code to change directory to the above folder
cd ‘/Users/{YourUserName}/Library/Application Support/IBM Notes Data’

Catatan perjalanan Haji dari Jepang (PENDAHULUAN)

Bismillahirrahmanirrahim

Dengan menyebut nama Allah yang Maha Pengasih lagi Maha Penyayang.

Assalamualaikum warrahmatullah akhifillah dan ukhtifillah yang diberkahi Allah, aamiin..

Alhamdulillah, segala puji serta syukur selalu kita panjatkan selalu kepada Allah, Tuhan semesta alam yang memberikan kita banyak kenikmatan, dan salam shalawat kepada imam kita Rasulullah sallallahu alaihi wasallam beserta keluarga san sahabat Beliau.

Sungguh tak bisa dilupakan ketika kami diberikan kesempatan Allah untuk datang ke rumahNya pada hari itu. Bangunan berbentuk persegi, diselubungi kain hitam bertuliskan lafadz Syahadat, di salah satu sudutnya terdapat Hajar Aswad, dan pintunya bernama Mulatazam, bangunan itu tiada lain adalah Ka`bah . Bangunan yang selama ini kita sholat menghadapnya.

Hampir setahun yang lalu kami melakukan Thawaf mengelilingi Ka`bah tapi rasanya masih kemarin kami melakukannya, dan rasanya ingin sekali kami kembali lagi ke sana ( ngarep rezeki Allah ^O^)

Insya Allah akhifillah dan ukhtifillah diberikan kesempatan serupa untuk bisa pergi ke Tanah suci secepatnya ^o^// dan bagi yang sudah pergi semoga bisa ke sana lagi dalam ibadah umrah ( jangan lupa ajak ajak ^0^ )

Cuap cuap pendahuluan sampai sini aja deh hehehe,,

Sampai bertemu di postingan selanjutnya ^^

Afwan lahir batin, jazakillah khoiran katsiran

Wassalamualaikum Warrahmatullah


thumb_IMG_2786_1024


~~~~~~~~~~~~~~~~~~~~~~~~~~~~~~~~~~~~~~~~~~~~~~~~~~~~~~~~~~~~~~~~~~~~~~~~~


How to find a word (or string) inside a folder?

grep -nr yourString /directory

result:
./fileA:10:. yourString
./fileB:11:. yourString
./fileC:13:. yourString

Linux bash profile

Understanding the Login Shell Process

When you log in to the Linux system, the bash shell starts as a login shell. The login shell typically looks for five different startup files to process commands from:

1. /etc/profile
→The /etc/profile file is the main default startup file for the bash shell. Whenever you log in to the Linux system, bash executes the commands in the /etc/profile startup first.

2. $HOME/.bash_profile

3. $HOME/.bashrc
→The .bashrc file does two things. First, it checks for a common bashrc file in the /etc directory. Second, it provides a place for the user to enter personal command aliases

4. $HOME/.bash_login

5. $HOME/.profile


Source: 
Linux Command Line and Shell Scripting Bible, Third Edition. (Book)

Cara Akses ke Balai Indonesia (Sekolah Republik Indonesia Tokyo – SRIT)

Warga negara Indonesia yang berdomisili di daerah Kanto (Tokyo, Saitama, Chiba, Kanagawa dan sekitarnya) terkadang sering mengadakan kegiatan besar di Balai Indonesia SRIT. Bagi yang belum mengetahui lokasi SRIT, mungkin akan sedikit kesulitan menemukan lokasinya yang boleh dibilang cukup jauh dari stasiun kereta terdekat, Stasiun Meguro (JR Yamanote Line, Tokyo Metro Namboku Line, Toei Mita Line, Tokyu Meguro Line).

Nah, berikut ini akan coba dijelaskan mengenai cara akses yang ditempuh untuk menuju Balai Indonesia SRIT. Dari Stasiun Meguro Anda dapat menggunakan bus. Naiklah bus dengan nomor-nomor yang tertera di bawah ini dari perhentian bus West Exit Stasiun JR Meguro. Turunlah di perhentian bus Motokeibajomae (元競馬場前).

  • 黒01 jurusan O-okayama Shogakkoumae (大岡山小学校前行き)
  • 東98 jurusan Todoroki Sosyajo (等々力操車所行き)
  • 黒02 jurusan Futako Tamagawa Eki (二子玉川駅行き)
  • 黒02 jurusan Sangenjaya Eki (三軒茶屋駅行き)

Setelah turun di perhentian bus Motokeibajomae, seberangilah jalan besar (Meguro Dori) pada zebra crossterdekat kemudian belok ke kanan. Pada belokan ketiga beloklah ke kiri dan berjalan lurus sampai ke ujung gang kemudian beloklah ke kiri. Anda akan dapat melihat gerbang Balai Indonesia (SRIT) di ujung gang tersebut.

Anda dapat juga berjalan kaki dari Stasiun Meguro ke Balai Indonesia (SRIT). Perjalanan kaki membutuhkan waktu sekitar 17 menit (lihat peta di bawah).


Lihat peta yang lebih besar


Officially published on IEEE Xplore Digital Library

Dzulfahmi, Naoya Ohta
Performance Evaluation of Feature Descriptors for Application in Outdoor-scene Visual Navigation
This paper has been presented in Master final defense, Gunma University in February 21st 2013.
The paper has also been accepted for an academic publication in the Asian Conference on Pattern Recognition 2013 (in conjunction with IAPR–International Association of Pattern Recognition), Okinawa, Japan.
Available online by IEEE Xplore Digital Library :
http://ieeexplore.ieee.org/xpl/articleDetails.jsp?arnumber=6778455
*    Authors:    Dzulfahmi, Naoya Ohta
*    Title of publication:    Performance Evaluation of Image Feature Detectors & Descriptors for Outdoor-scene Visual Navigation
Book, magazine or journal:    2nd IAPR Asian Conference on Pattern Recognition (ACPR) 2013, p. 872 – 876
*    Publisher:    IEEE Xplore
*    Year of publication:    2013
ISBN/ISSN:    14197968

Please refer to the below presentation for the topic of my paper.
Oral Presentation at Master final defense.

Libur musim semi

[Wisata Jepang] Tokyo Sky Tree Night View

%d bloggers like this: